In this article, we will go through how to built a multimodal LLM named Jñāna (sanskrit word for knowledge). You can try out the huggingface app Jñāna to see how it works. For video demo, go to the demo section below and for github code, go to the code section. This article mainly deals with 3 sections – Stage 1 training, Stage 2 training and building the app. Let us get started.
Table of contents
Introduction
Jñāna-Phi2-Multimodal-Conversation-Agent is a gradio app hosted on huggingface spaces. Jñāna is capable of accepting inputs in the form of image/audio/text or a combination of any of these 3 and returns output in the text format. Jñāna uses microsoft/phi2 LLM model that was trained based on Llava 1.0 and Llava 1.5 papers. Qlora PEFT strategy was used for fine-tuning phi2.
What is a multimodal LLM ? Traditional language models generally accepts text input alone and generates text based on the same. Whereas multimodal LLMs are capable of handling wide variety of input formats like image, audio, text and video. They are also capable of generating outputs in different formats like image, audio, text and video. A super multi-modal LLM will look like below:

In this article, we will be dealing only with image, audio, text inputs and will get text response as output. Let us delve into the training strategy and other details in below sections.
Demo
Below is an image inferred by Jnana accepting all 3 forms of input – image, audio and text. Audio query was “Please explain this image“. Also given below is youtube video link where you can find more demos for various combination of inputs: Jnana Youtube demo

Stage 1 : Training the projection models
Our objective here is to build a multimodal LLM. Multimodal means LLM should be capable to accept inputs in forms additional to usual text format. In our case, we are attempting to equip LLM to accept image and audio inputs apart from the text. We will use microsoft/phi2 as our LLM here. But phi2 is a textual LLM which means it accepts text tokens only as input. It doesn’t have innate capabilities to accept image or audio as input. So we have to convert image and audio to a format that phi2 can accept and understand. In stage-1, we will deal with converting image to an embedding format that phi2 can accept and process. Let us first understand the dataset and dataloading part required for stage-1 training.
Stage 1 : Dataset and dataloading
We will be using the images from instruct150k dataset and their corresponding captions from coco dataset. Instruct150k has 81479 images in it. All these images belong to the coco-train-2017-dataset. We will download the captions corresponding to these images from coco using !wget http://images.cocodataset.org/annotations/annotations_trainval2017.zip
We will then create a custom dataset that uses dynamic padding based on these images and captions. Code for the same is as below
class ClipEmbeddingDataset(Dataset):
    def __init__(self, image_names, caption_dict, tokenizer):
        self.data = image_names
        self.caption_dict = caption_dict
        self.tokenizer = tokenizer
        self.data_collator = DataCollatorWithPadding(tokenizer=self.tokenizer)

    def __len__(self):
        return len(self.data)

    def __getitem__(self, idx):

        return {
            'image_names': self.data[idx],
            'idx': idx
        }

    def tokenize_function(self, caption):
        return self.tokenizer(caption, truncation=True)

    def collate_fn(self, batch):
        image_names = [item['image_names'] for item in batch]
        captions = [self.caption_dict[image_name] for image_name in image_names]
        tokenized_caption_samples = []
        for caption in captions:
            tokenized_caption_dict = self.tokenize_function(caption)
            tokenized_caption_samples.append(tokenized_caption_dict)
        collated_captions = self.data_collator(tokenized_caption_samples)
        caption_tokens = collated_captions['input_ids']
        caption_attn_mask = collated_captions['attention_mask']

        return {
            'image_names': image_names,
            'captions': captions,
            'caption_tokens': caption_tokens,
            'caption_attn_mask': caption_attn_mask
        }

dataset = ClipEmbeddingDataset(image_names_lst, instruct150k_caption_data, tokenizer)

batch_size = 2
dataloader = DataLoader(dataset, batch_size=batch_size, collate_fn=dataset.collate_fn, shuffle=True)
In the code, dataset is created using below components:
- instruct150k_caption_data : This is a python dictionary that comprises of records in below format. Here each image correponding to instruct150k image is appended with strings _0, _1, _2, _3, _4 corresponding to their 5 coco captions. Thus, this will have
81479 * 5records in it. But, we will use only81479out of it (first caption only)
{'000000318556.jpg_0': 'A very clean and well decorated empty bathroom',
 '000000318556.jpg_1': 'A blue and white bathroom with butterfly themed wall tiles.',
 '000000318556.jpg_2': 'A bathroom with a border of butterflies and blue paint on the walls above it.',
 '000000318556.jpg_3': 'An angled view of a beautifully decorated bathroom.',
 '000000318556.jpg_4': 'A clock that blends in with the wall hangs in a bathroom. ',
 '000000116100.jpg_0': 'A panoramic view of a kitchen and all of its appliances.',
 '000000116100.jpg_1': 'A panoramic photo of a kitchen and dining room',
 '000000116100.jpg_2': 'A wide angle view of the kitchen work area',
 '000000116100.jpg_3': 'multiple photos of a brown and white kitchen. ',
 '000000116100.jpg_4': 'A kitchen that has a checkered patterned floor and white cabinets.',
 ......
'000000379340.jpg_4': 'A street sign modified to read stop bush.'}- image_names_lst : This is a python list having the image names corresponding to the first caption alone i.e.
['000000318556.jpg_0', '000000116100.jpg_0', '000000379340.jpg_0',….,'000000134754.jpg_0']. This will have81479records in it.
- tokenizer : We will be using microsoft/phi2 tokenizer as below. We will also resize the token embeddings of phi2 model based on len(tokenizer). phi2 output embedding size is 51200 whereas length of our tokenizer here is 50295, hence resizing is done to avoid mismatch during training.
model_name = "microsoft/phi-2"
phi2_model = AutoModelForCausalLM.from_pretrained(model_name, trust_remote_code=True).to(device)

tokenizer = AutoTokenizer.from_pretrained(model_name, trust_remote_code=True, use_fast=False)
print(f'len(tokenizer 1: {len(tokenizer)}')

tokenizer.pad_token = tokenizer.eos_token
bos_token_id = tokenizer.bos_token_id
pad_token_id = tokenizer.bos_token_id
eos_token_id = tokenizer.bos_token_id
eoi_string = 'caption image:'
eoi_tokens = tokenizer.encode(eoi_string)
print(f'eoi_tokens : {eoi_tokens}')
print(bos_token_id, pad_token_id, eos_token_id)
print(tokenizer.decode([50256, 50256, 50256]))
print('eoi tokens decoded:', tokenizer.decode(eoi_tokens))
print(len(tokenizer)) # 50295

phi2_model.resize_token_embeddings(len(tokenizer))
self.data_collator = DataCollatorWithPadding(tokenizer=self.tokenizer)-> This helps in dynamic padding. Refer HF Data Collator for more details. We will come to know how it helps in dynamic padding once we inspect the code below.
Now, let us inspect each part of dataset code to understand its working.
    def __init__(self, image_names, caption_dict, tokenizer):
        self.data = image_names
        self.caption_dict = caption_dict
        self.tokenizer = tokenizer
        self.data_collator = DataCollatorWithPadding(tokenizer=self.tokenizer)
This is the init method of our ClipEmbeddingDataset class.
    def __len__(self):
        return len(self.data)

    def __getitem__(self, idx):

        return {
            'image_names': self.data[idx],
            'idx': idx
        }
This is __len__ and __getitem__ methods of our ClipEmbeddingDataset class. Please note that we are driving our data generation using self.data which is image_names_lst – python list having image names like ['000000318556.jpg_0', '000000116100.jpg_0']
    def tokenize_function(self, caption):
        return self.tokenizer(caption, truncation=True)

    def collate_fn(self, batch):
        image_names = [item['image_names'] for item in batch]
        captions = [self.caption_dict[image_name] for image_name in image_names]
        tokenized_caption_samples = []
        for caption in captions:
            tokenized_caption_dict = self.tokenize_function(caption)
            tokenized_caption_samples.append(tokenized_caption_dict)
        collated_captions = self.data_collator(tokenized_caption_samples)
        caption_tokens = collated_captions['input_ids']
        caption_attn_mask = collated_captions['attention_mask']

        return {
            'image_names': image_names,
            'captions': captions,
            'caption_tokens': caption_tokens,
            'caption_attn_mask': caption_attn_mask
        }
collate_fn is the main method of our dataset class. It accepts the batch that we get from __getitem__ method.
- It will collect image names in a list
image_names = [item['image_names'] for item in batch] - It will collect captions also in a list
captions = [self.caption_dict[image_name] for image_name in image_names]
- Then it will tokenize each caption and write it to another list
tokenized_caption_samples
        tokenized_caption_samples = []
        for caption in captions:
            tokenized_caption_dict = self.tokenize_function(caption)
tokenized_caption_samples.append(tokenized_caption_dict)- This list of captionized tokens is passed through data collator
collated_captions = self.data_collator(tokenized_caption_samples) - Here, data_collator will make the caption lengths uniform. Let us say we have 2 captions of token lengths 10 and 15 each. Then, the 15 token caption will be kept as such. The 10 token caption will be padded by 5 tokens so that it will also have 15 tokens. Thus, in a batch all the captions will match the size of the biggest caption present. An example shown as below. Here 1st token is padded by 1 token (50256) to match the length of longest caption – 13.
['One sheep running through the shrub brush of a field.', 'The view of a kitchen with a window that is opened slightly.']
torch.Size([2, 13])
tensor([[ 3198, 15900,  2491,   832,   262, 10157,   549, 14093,   286,   257,  2214,    13, 50256],
        [  464,  1570,   286,   257,  9592,   351,   257,  4324,   326,   318,  4721,  4622,    13]])
- collated_captions coming out from data collator will be a dictionary having 2 keys – ‘input_ids’ and ‘attention_mask’
- ‘input_ids’ will have the list of caption tokens
- ‘attention_mask’ will have the masks where tokens that need to be attended will have 1s whereas irrelevant tokens will hav 0s (padded tokens). We wont use this.
- We will capture input_ids & attention_mask as below
        caption_tokens = collated_captions['input_ids']
caption_attn_mask = collated_captions['attention_mask']- Finally we will return this as below
        return {
            'image_names': image_names,
            'captions': captions,
            'caption_tokens': caption_tokens,
            'caption_attn_mask': caption_attn_mask
}- Next we will create dataset as below
dataset = ClipEmbeddingDataset(image_names_lst, instruct150k_caption_data, tokenizer)- Then we will create a dataloader that will be used for data generation while training
batch_size = 2
dataloader = DataLoader(dataset, batch_size=batch_size, collate_fn=dataset.collate_fn, shuffle=True)
print(len(dataset)) # 81479- Sample records that will be coming out will look like below:
for idx, batch in enumerate(dataloader):
    image_names = batch['image_names']  # List of image names corresponding to each data slice
    captions = batch['captions']  # List of captions corresponding to each data slice
    caption_tokens = batch['caption_tokens']  # Shape: [batch_size, max_seq_len]
    caption_attn_mask = batch['caption_attn_mask']
    print(idx)
    print(image_names)
    print(captions)
    print(caption_tokens.shape, caption_tokens)
    print(caption_attn_mask.shape)
    print('---------')
    if idx > 0:
        break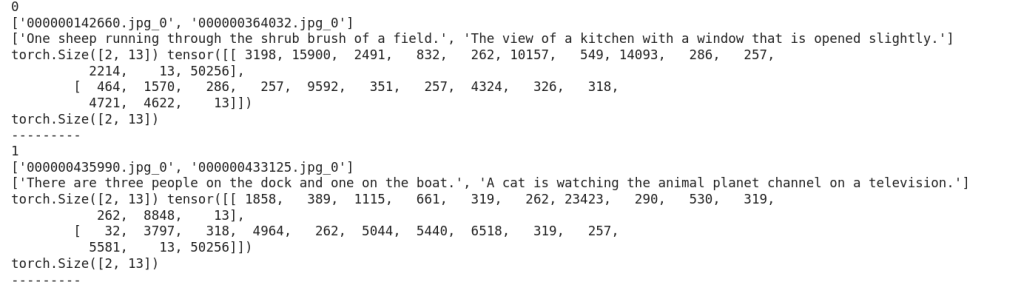
Now, let us look how training is done.
Stage 1 : Training
Below is a snap depicting the overall flow of stage-1 :
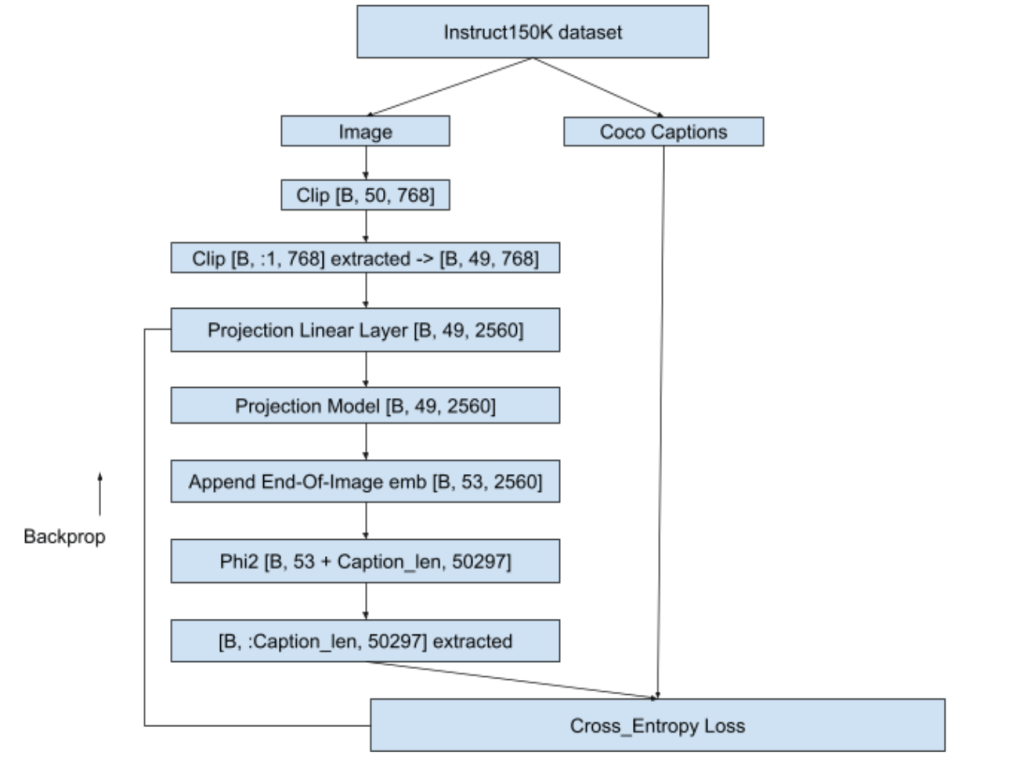
- We will pass the image to a CLIP model – openai/clip-vit-base-patch32. We will take the image embeddings from CLIP – one before projection layer whose shape is [50, 768]. As suggested in Llava1.0 paper we will discard the 1st layer that has CLS embeddings and retain [49, 768].
- We will pass this [49, 768] through a linear layer that will convert Clip embeddings to phi2 embedding dimensions i.e. from [49, 768] to [49, 2560]. We will then pass this [49, 2560] through projection model (Reference : Llava 1.5 Simple Res Block ). This projection model is responsible for making clip embeddings understandable to the phi2. In other words, projection model will capture the meaning of image and share it with phi2.
- phi2 used is pre-trained version from HF and in this stage we wont fine-tune phi2. Same goes for Clip as well i.e. phi2 and clip weights will remain frozen while projection linear layer and projection weights will get trained.
- Projection model will give us [49, 2560] as output. We will append an end-of-image token to this [49, 2560] to indicate that image embeddings ended. We used the text “caption image:” as end-of-image string. This EOI string was tokenized using microsoft/phi2 tokenizer that we created above.
- These EOI integer tokens were then passed through input-embed layer of pretrained phi2 model to get [4, 2560] where 2560 is the phi2 embedding dimension.Then, this [4, 2560] will be appended with the [49, 2560] that we got from projection model to get [53, 2560]. We will pass this [53, 2560] embeddings to phi2 forward method again & again until the caption length of image is matched as seen below. We will extract the last layers correpsonding to the caption and compare it with ground truth caption for loss calculation.
- Loss is backpropagated, projection linear layer and projection model weights updated and next batch picked-up. Loss used is cross_entropy loss.
- Training loop is as shown below:

Training was done on ~30K images out of 81K on A100 (40GB VRAM gpu) and stopped when loss value dropped from 9.8783 to 1.1321. Teacher-forcing was used while training to help faster convergence and batch-size used was 2. This training consumed approximately 200 GPU compute units in google colab. Details of training can be seen in ‘Teacher forcing + Calling embeddings each time with EOI token as “caption image:” for 81K images’ section in the colab notebook ERA1_s29_stage1_experiment_v1.ipynb
Now with our projection model trained, let us move to stage 2 of training.
Stage 2 : Fine tuning the projection models and phi2
Pretrained phi2 is capable of only generating text. We have to fine-tune phi2 to engage in a conversation i.e when asked a query it should be able to answer it sensibly. In stage 1, we trained projection model which will now give us meaningful context about the image. In stage 2, we will fine-tune the phi2 so that it will become capable to handle a conversation. We will also fine-tune the projection linear layer and projection model so that they continue to learn about the images from the conversation data also. Let us first look into the dataset and dataloader part.
Stage 2 : Dataset and dataloader
Training was done on instruct150K dataset in stage 2 also. However, in stage-1 we trained instruct150k images against coco-captions, whereas here we will use the images with question/answer format present in instruct150k. This is because our training objective in stage-2 is to make phi2 capable for conversations.
- Instruct150k conversation were broken down into question-answer format and in total 3_56_752 records were there. This json format was sorted based on ascending order of answer length. Then, answer lengths upto 119 tokens that comprises 2_60_564 records were trained against T4 GPU (15 GB VRAM) in different batches. Different batch_sizes were choosen to avoid OOM issues as below:
- Answer length 1 to 11 : 45557 records : bs = 10
- Answer length 12 to 17: 53028 records : bs = 10
- Answer length 18 to 23: 44613 records : bs = 9
- Answer length 24 to 40: 52452 records : bs = 8
- Answer length 41 to 59: 13482 records : bs = 6
- Answer length 60 to 79: 21832 records : bs = 5
- Answer length 80 to 99: 16162 records : bs = 4
- Answer length 100 to 119: 28228 records : bs = 4
- Code for dataset is as below:
class ClipEmbeddingDataset(Dataset):
    def __init__(self, data, tokenizer):
        self.data = data
        self.tokenizer = tokenizer
        self.data_collator = DataCollatorWithPadding(tokenizer=self.tokenizer)

    def __len__(self):
        return len(self.data)

    def __getitem__(self, idx):

        return {
            'image_names': self.data[idx][-1]['image'],
            'idx': idx,
            'qn_text': self.data[idx][-1]['qn'],
            'ans_text': self.data[idx][-1]['ans']
        }

    def tokenize_function(self, caption):
        return self.tokenizer(caption, truncation=True)

    def collate_fn(self, batch):
        image_names = [item['image_names'] for item in batch]
        qns = [item['qn_text'] for item in batch]
        ans = [item['ans_text'] for item in batch]
        tokenized_qns_lst = []
        for qn in qns:
            tokenized_qns_dict = self.tokenize_function(qn)
            tokenized_qns_lst.append(tokenized_qns_dict)
        collated_qns = self.data_collator(tokenized_qns_lst)

        tokenized_ans_lst = []
        for an in ans:
            tokenized_ans_dict = self.tokenize_function(an)
            tokenized_ans_lst.append(tokenized_ans_dict)
        collated_ans = self.data_collator(tokenized_ans_lst)
        qn_tokens = collated_qns['input_ids']
        an_tokens = collated_ans['input_ids']

        return {
            'image_names': image_names,
            'qn': qn_tokens,
            'ans': an_tokens
        }

dataset = ClipEmbeddingDataset(stage_2_data_c100_119, tokenizer)

batch_size = 9
dataloader = DataLoader(dataset, batch_size=batch_size, collate_fn=dataset.collate_fn, shuffle=True)
print(len(dataset))
ClipEmbeddingDataset is created from python lists like stage_2_data_c100_119. Here c100_119 means answer lengths corresponding between 100 and 119 are considered. Similarly, if it was 80 to 99 then the name of that list will be stage_2_data_c80_99 and so on.
This python list (eg: stage_2_data_c100_119) contains a collection of lists. Each list corresponds to a single conversation. List will have two elements – first element is the answer length, second element is a dictionary. Dictionary will have following keys : 'image', 'qn', 'ans'. Here 'image' holds the image name. 'qn' holds the question related to the image and'ans' holds answer to that question. A sample record is as shown below:
'image' : '000000211217.jpg'
'qn' : 'What does the image suggest about the man's skill or experience with playing frisbee?'
'ans':
'Note that while the image provides some clues about the man's potential abilities, it is not definitive proof of his expertise. It is, however, a representation of an individual enjoying and engaging in a physical activity that requires coordination and skill, showcasing the flexibility and versatility of the human body in motion'
Dataset creation is similar to stage-1. Here dynamic padding will be applied to both question and answer. For example, if biggest question length in the batch is 15, then all the shorter questions in the batch will be padded to 15. Same applies for answer too.
Stage 2 : Training
- While training, we will append the
[53, 2560]that we get as output from projection model with the query embeddings and then generate the answer. This answer will be then compared with the ground truth answer. - To stay within the memory constraints, phi2 will be downloaded in 4-bits and trained using peft-qlora strategy.Peft-qlora strategy will add adapter weights on top of the pretrained phi2 model which comes to be around just 3% of total weights
trainable params: 94,371,840 || all params: 2,869,421,175 || trainable%: 3.28which is light-weight and manageable - Unlike stage 1, stage 2 was trained with a single
model.forward()call to phi2 making it memory efficient. Let us understand the training flow using below image:

For an answer of 30 tokens and question of 20 tokens, training happens as below:
- Input
<img emb [B, 49, 2560] > + <EOI [B, 4, 2560]> + <Qn [B, 20, 2560]> + <EOQ [B, 4, 2560]> + <Ans [B, 30, 2560]><EOI [B, 4, 2560]>-> EOI used is same as in stage-1 i.e. “caption image:”<EOQ [B, 4, 2560]>-> EOQ i.e End Of Question used is “end of question:”
- Input shape will be
[B, 107, 2560] - Input goes to
model.forward()and gets back logits of[B, 107, 50257] - preds = Take final token of EOQ + last 30 tokens which will be
[B, 76:, 50257] - Add End-of-Sentence “
<|endoftext|>” token to the answer target - Compare preds with target for loss calculation
Loss calculation happens as below. Shown below is for a single batch but it can scale to any number of batches. Loss used is cross-entropy loss here as well.

- In this example, when last token of EOQ “:” is encountered, model is expected to predict first word of the answer which is “The“
- Similarly when “The” is seen, model should predict “color” and so on
- Finally when “.” is seen, model should predict “<|endoftext|>“
- As we can see, in the image above except for 3 tokens (circled in red), model got it correct
This training consumed approximately 110 GPU compute units in google colab. Training loss started at 3.634 at first batch and came down to 1.2028 at the final batch. Once training was done, fine-tuned phi2 qlora model was merged with publically available existing huggingface microsoft/phi2 model. This new model now available in HF as anilbhatt1/phi2-proj-offset-peft-model was used for inferencing in the Jñāna app.
Details of stage-2 training can be seen in the colab notebook ERA1_s29_stage2_experiment_v1.ipynb
Now, let us move to the audio-integration and inferencing part
Stage 3 : Integrating audio and building Jñāna huggingface spaces app
In stage 2, we equipped our model to accept an image and strike a conversation based on that image or textual query that we supply. However, our objective is to have our app capable of handling audio query as well. There are 2 ways to deal with audio:
- Develop a projection model and train like we did in stage-1 and integrate it with phi2
- Take an already available audio model, feed the audio to this model, get the text as output and feed this text as a query to multimodal LLM model
We will follow the latter approach i.e. using an existing audio model. We will use the whisperx model for handling the audio query. Below portion of code will accept the audio, convert it to text and tokenize it to feed to our stage-2 trained model.
        !pip install -q git+https://github.com/m-bain/whisperx.git
        import whisperx
        audio_model = whisperx.load_model("small", "cuda", compute_type="float16")
        audio_result = audio_model.transcribe(audio)
        audio_text = ''
        for seg in audio_result['segments']:
            audio_text += seg['text']
        audio_text = audio_text.strip()
        audio_tokens = tokenizer.encode(audio_text)
Then we will prepare the input_embed as below as applicable in below sequence:
image embed [49, 768] (if image present) + eoi [4, 768] + audio-qn embed (if audio present) + text-qn embed (if text present) + eoq [4, 768]
This input_embed is fed to model to generate output response text as below:
        max_len = 200
        output = self.phi2_model.generate(inputs_embeds=input_embed,
                                          max_new_tokens=max_len,
                                          return_dict_in_generate = True,
                                          bos_token_id=bos_token_id,
                                          pad_token_id=bos_token_id,
                                          eos_token_id=bos_token_id)
Details of inferencing tried in google colab can be found in ERA1_s29_Gradio_v1.ipynb
Budget
Overall it costed me ~ ₹4000 (around $50) to develop this LLM apart from my 3 weeks personal effort. Break-down of costs as follows:
- ~ $12 for 4 RTX 3090 GPUs to train phi2 from scratch on stage-0
- ~ $26 for A100 compute units to train proj model on stage-1
- ~ $12 for T4 compute units to fine-tune proj model and phi-2 on stage-2
- Inferencing was experimented in free colab T4 GPU
Code
- Details of stage-1 training can be seen in ‘Teacher forcing + Calling embeddings each time with EOI token as “caption image:” for 81K images’ section in the colab notebook ERA1_s29_stage1_experiment_v1.ipynb
- Details of stage-2 training can be seen in the colab notebook ERA1_s29_stage2_experiment_v1.ipynb
- Details of inferencing tried in google colab can be found in ERA1_s29_Gradio_v1.ipynb
Credits
- Rohan Shravan, The School of A.I.
- whisperX for audio
- Llava 1.0 paper
- Llava github
- GPT LLM trainer
- HF PEFT training pytorch example
Contact Me
Connect me in linkedin at Anil Bhatt
